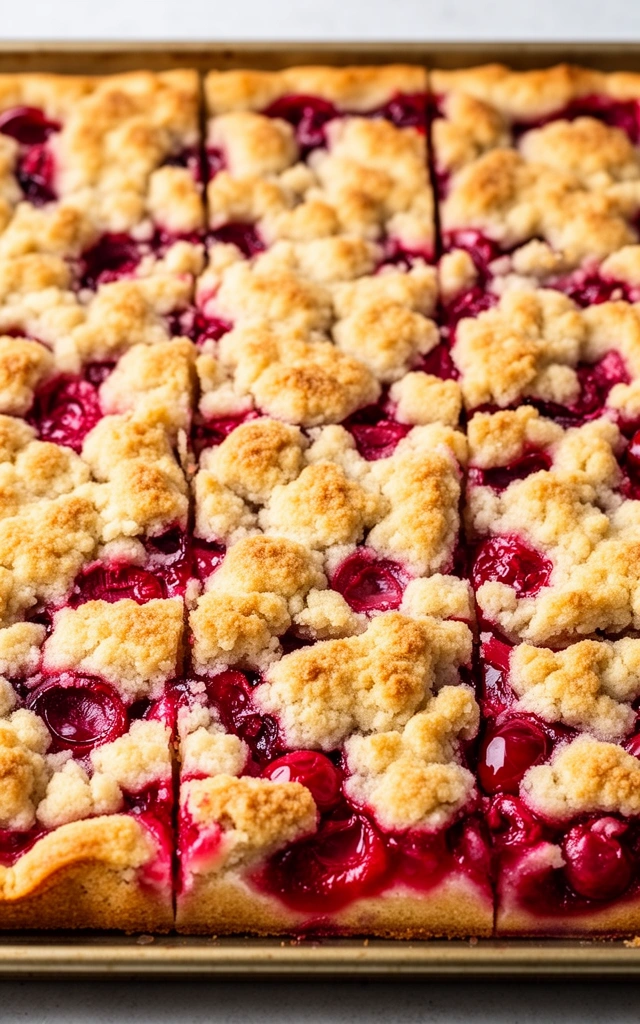
Cherry Pie Crumble Bars

Hey there, fellow dessert lover! If you’re anything like me, cherries are basically nature’s candy—bright, juicy, and just a little tart. And when cherry season hits, I get a little obsessed, trying to find ways to enjoy those fresh pops of flavor beyond just snacking straight from the bowl. That’s where cherry pie crumble bars come in—think of them as a portable, layered love letter to cherries, with a buttery crumble topping that’s basically addictive.
Today, I’ll walk you through how to whip up these delicious bars that are perfect for picnics, brunches, or just because you deserve a sweet treat. They’re easy to make, look fancy enough to impress, and taste so good you’ll want to make them again and again. So, grab your apron, and let’s get baking!
Why You’ll Love Cherry Pie Crumble Bars
Before we dive into the recipe, let me tell you why these bars are a total game-changer:
- Portable and mess-free: No forks needed, just grab a square and go.
- Burst of cherry flavor: Fresh or frozen cherries work perfectly, giving you that vibrant tartness.
- Crumbly, buttery topping: It’s like a cookie and crumble had a delicious lovechild.
- Versatile: Serve them warm with a dollop of whipped cream or drizzle with extra maple syrup for an extra sweet kick.
Honestly, these bars are a crowd-pleaser and a personal favorite of mine because they strike that perfect balance between sweet and tangy. Plus, they’re pretty forgiving—no fancy skills required.
What You’ll Need: Ingredient Breakdown
Here’s what you’ll need to make these cherry pie crumble bars. I’ve included measurements to keep things easy-peasy.
For the Cherry Filling
- 2 cups fresh or frozen cherries (pitted)
- ¼ cup granulated sugar (or adjust if cherries are sweeter)
- 1 tablespoon cornstarch (to thicken the filling)
- 1 teaspoon vanilla extract
- A pinch of salt
For the Crust and Crumble Topping
- 2 cups rolled old-fashioned oats
- ¼ cup pure maple syrup (for a touch of natural sweetness)
- 1 teaspoon baking powder
- 1 ½ teaspoons ground cinnamon
- ½ teaspoon sea salt
- 2 cups unsweetened vanilla almond milk (or any plant-based milk)
- 1 tablespoon ground flaxseed (or 1 large egg, if preferred)
- 2 tablespoons coconut oil, melted
- 2 teaspoons vanilla extract
- 2 ripe bananas, mashed
For Serving (Optional but Highly Recommended!)
- Additional blueberries
- Nut butter (peanut, almond, etc.)
- Extra maple syrup
How to Make Cherry Pie Crumble Bars: Step-by-Step
Now that we’ve got our ingredients, let’s get into how to turn these into the most drool-worthy bars ever.
Step 1: Prep Your Oven and Dish
Preheat your oven to 375°F (trust me, this temp is perfect for baking that golden top). Spray an 8-inch square baking dish with non-stick spray or line it with parchment paper—you want easy cleanup and no sticky surprises.
Step 2: Make the Cherry Filling
In a small bowl, toss the cherries with sugar, cornstarch, vanilla, and a pinch of salt. If you’re using frozen cherries, let them thaw a bit and drain any excess moisture. This filling will thicken as it bakes, creating that luscious, jammy center.
Step 3: Prepare the Crust and Crumble
In a large mixing bowl, combine the oats, baking powder, cinnamon, and salt. In a separate bowl, whisk together the almond milk, maple syrup, egg or flaxseed, melted coconut oil, vanilla, and mashed bananas. Mix the wet ingredients into the dry, stirring until everything’s well combined.
Gently fold in 1 cup of blueberries—because, IMO, blueberries add a nice burst of flavor and color.
Step 4: Assemble the Bars
Pour the batter into your prepared baking dish, spreading it out evenly. Dollop the cherry filling on top, spreading it gently so it doesn’t sink to the bottom. Then, sprinkle the remaining blueberries across the top for that extra pop of color and flavor.
Step 5: Bake to Perfection
Pop it into the oven and bake for about 40 to 55 minutes. Keep an eye on it; you want the top to be golden and the filling to be bubbly. If it starts to brown too quickly, tent it with foil. Once done, let it cool for a few minutes—you’ll thank me when you’re not burning your tongue on hot cherry goodness.
Step 6: Serve and Enjoy
Slice into squares, and if you’re feeling fancy, add a drizzle of nut butter or a splash of maple syrup on top. A few extra blueberries on each piece make it look pretty and taste even better.
Tips for Perfect Cherry Pie Crumble Bars
- Cherry choice: Fresh cherries are amazing, but frozen work just fine—just drain them well.
- Sweetness level: Adjust sugar based on your cherries’ sweetness. FYI, the natural tartness of cherries is what makes these bars so addictive.
- Crumble texture: For a crunchier topping, you can add a handful of chopped nuts or shredded coconut to your crumble mixture.
- Layering: Don’t overmix the filling or batter. Gentle folding keeps the texture nice and crumbly.

Storage and Reheating Tips
Want these bars to stay fresh? Here’s how:
- Refrigerate: Store leftovers in an airtight container in the fridge for up to 5 days. They’re still tasty cold or at room temp.
- Reheat: To warm up, cover with foil and bake at 350°F for about 20 minutes or microwave individual pieces for about 30 seconds. Quick and cozy!
Bonus:
If you want to make these ahead for a picnic or party, cut them into squares, then wrap each piece tightly with plastic wrap. They’re portable and travel well!
Final Thoughts: Why You Need These Cherry Pie Crumble Bars
Honestly, these bars are a total win. They combine the best of a cherry pie with the convenience of a bar, all wrapped up in a buttery crumble that’s just chef’s kiss. Whether you’re baking for a crowd or craving a personal treat, I promise these will satisfy that sweet, tart craving every time.
So, what are you waiting for? Grab those cherries and get baking! And don’t forget to share if you love them—because good things are meant to be enjoyed together 😊. Happy baking!
P.S. If you try this recipe, tag me on social media! I love seeing your creations. And hey, maybe next time I’ll add a sprinkle of dark chocolate chips—because, IMO, everything’s better with chocolate. 😉
9
servings20
minutes50
minutes290
kcalIngredients
2 cups fresh or frozen cherries, pitted
1/4 cup granulated sugar
1 tablespoon cornstarch
1 teaspoon vanilla extract
a pinch of salt
2 cups rolled old-fashioned oats
1/4 cup pure maple syrup
1 teaspoon baking powder
1 1/2 teaspoons ground cinnamon
1/2 teaspoon sea salt
2 cups unsweetened vanilla almond milk (or any plant-based milk)
1 tablespoon ground flaxseed (or 1 large egg)
2 tablespoons coconut oil, melted
2 teaspoons vanilla extract
2 ripe bananas, mashed
1 cup blueberries (folded into batter)
extra blueberries (for topping, optional)
Directions
- Preheat oven to 375°F (190°C). Spray an 8-inch square baking dish with non-stick spray or line with parchment paper.
- Make cherry filling: In a small bowl, toss cherries with sugar, cornstarch, vanilla extract, and a pinch of salt. If using frozen cherries, thaw slightly and drain excess moisture.
- Make crumble/batter: In a large bowl, combine oats, baking powder, cinnamon, and sea salt. In a separate bowl, whisk almond milk, maple syrup, flaxseed (or egg), melted coconut oil, vanilla, and mashed bananas. Mix wet into dry until well combined.
- Fold in 1 cup blueberries.
- Assemble: Pour batter into the prepared dish and spread evenly. Dollop the cherry filling on top and gently spread so it doesn’t sink completely to the bottom. Sprinkle extra blueberries over the top if desired.
- Bake 40 to 55 minutes, until the top is golden and the filling is bubbly. If browning too quickly, tent loosely with foil.
- Cool for a few minutes, then slice into squares and serve.
Notes
- Storage: keep in an airtight container in the fridge up to 5 days. Reheat at 350°F for about 20 minutes (covered with foil) or microwave individual pieces about 30 seconds. If cherries are very tart, you can add a little more sugar to taste.